Baseball & Onion Strings

27 May

11167807_10205713950502098_1311209804985492567_n

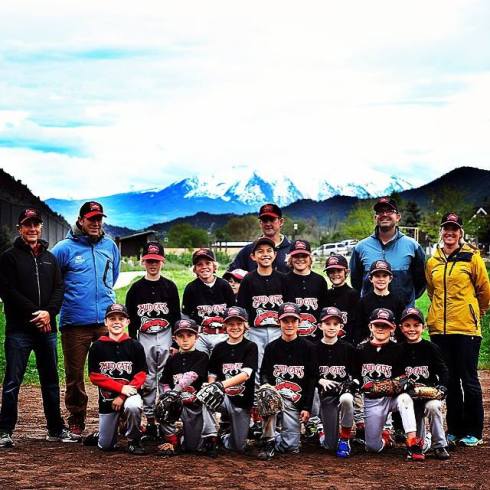
How gorgeous is this Little League ball field?  That stunning background is brought to you by Mount Sopris, one of Colorado’s beauties!  Oh and those handsome boys you see, those are the “Mud Cats”.  My older two boys have been members of this crazy Little League Team this season and we’ve had a blast!  They play in the “minor leagues” which is designated for 8 & 9 year olds and it’s been amazing to watch their skills improve every game!  Last night our team won the first game of the Little League Championship Tournament.  It was a nail biter for sure.  The Mud Cats were down 7-3 in the third inning.  In the fifth inning we scored 3 to bring the score within one.  We scored two runs in the top of the sixth and headed into the bottom of the sixth up by one run.  One thing you should know about Little League at this level is that we play six innings or two hours, which ever comes first.   With two outs and a man on third, the Raptors were prepped to score the tying run.  Our pitcher fielded a ground ball and tagged out the runner right before home base- MUD CATS WIN!!!!    My heart was racing and the boys were so excited!  The Raptors played an awesome game and we were beyond thankful for the bit of luck that goes along with every baseball game!  Of course following the game we enjoyed celebratory ice cream together and headed home to have sweet dreams of America’s Favorite Pastime.

In honor of our BIG WIN, we are going to enjoy a baseball themed dinner tonight at home!  My hubby is an awesome cook and likes to be creative with even the simplest of foods…  Here is his take on “Baseball Food”.

11188496_10153331916898179_5120749556314526655_n

Fancy hot dogs, homemade onion strings and of course a cold one…  The boys will get root beer or Izze instead (of course)…

Here is the recipe for the most delicious onion strings this side of Mount Sopris…

Ingredients

  • 1 whole Large Onion
  • 2 cups Buttermilk
  • 2 cups All-purpose Flour
  • 1 Tablespoon (scant) Salt
  • 1/4 teaspoon (to 1/2 Teaspoon) Cayenne Pepper
  • 1 quart (to 2 Quarts) Canola Oil
  • Black Pepper To Taste

Preparation Instructions

Slice onion very thin. Place in a baking dish and cover with buttermilk and soak for at least an hour.

Combine dry ingredients and set aside.

Heat oil to 375 degrees.

Grab a handful of onions, throw into the flour mixture, tap to shake off excess, and PLUNGE into hot oil. Fry for a few minutes and remove as soon as golden brown.

Repeat until onions are gone.  Enjoy them with a juicy steak or in this case a fancy hot dog :).

Beer Bread

11 May

Image-1-1

OK, are you stuck on the Minnesota cutting board?  It’s cute, right?  Once a Minnesota girl always a Minnesota girl, that’s what I say!  OK lets look past the adorable cutting board to the delicious bread sitting on it!  This is one of the easiest “quick bread” recipes I’ve found!  You can definitely replace the beer with soda and yeast or even water and yeast!  The most important part of this recipe is that you sift the flour!  You can do this using a flour sifter, metal strainer or even a slotted spoon!  If you do not sift the flour your bread will be very dense and heavy!  The other option with this bread is to mix the butter into the batter which creates a softer bread.  Pouring the butter over the top creates a buttery crispy crust.  I love this bread as a side for just about anything…  With yummy salad season approaching this is a fun bread to accompany your greens.  It’s also great in the winter with soup or chili!    ENJOY!

Ingredients

    • 3 cups flour ( sifted- very important)
    • 3 teaspoons baking powder
    • 1 teaspoon salt
    • 1/4 cup sugar
    • 1 (12 ounce) can beer (see directions for other options)
    • 1/4 cup melted butter

Directions

  1. Preheat oven to 375 degrees.
  2. Sift the flour through a sifter or even a metal strainer- even a slotted spoon!  This is very important so that your bread is not too dense!
  3. Mix dry ingredients and beer.
  4. Pour into a greased loaf pan.
  5. Pour melted butter over mixture. (If you’d like softer bread versus a crispy crust, mix the butter into the batter)
  6. Bake 1 hour, remove from pan and cool for at least 15 minutes.
  7. If you do not have or want to use BEER you can use 2 teaspoons yeast and a can of soda or other liquid 🙂
  8. If your bread tastes like a heavy brick, most likely it’s because the flour wasn’t sifted correctly!

Creamy Sloppy Joe’s – Burger Joe’s

9 May

DSC_6129

This recipe comes from our dear friends Jennifer & Bethany.  Their mom started to create a cookbook for her daughters while she was battling cancer.  The cookbook did not get finished prior to her passing away, so her daughters are finishing it in her memory.  They are both super creative so of course their idea is AWESOME… They put out a plea on Facebook for anyone who might want to make some of their mom’s recipes, photograph the end product, and send it back to them.  This alleviates them having to make all of the food and also allows the rest of us to enjoy some of their mom’s meals… CREATIVE, right??  They put out a google doc with all of the recipes and we signed up for as many as we were able to make.   A great way to honor Ms. Denise-I’d say!  Tonight we made the first of Denise’s recipes for the cookbook.  They are called “Burger Joe’s”.  They are kind of like sloppy joe’s, but much less messy and much less tomato-eee…  They sound kind of crazy, but were actually really good.  Ben and I had a lot of fun making them together and of course being the photog that he is (www.bendodds.com) doing a little food styling while we were at it!  All THREE of my boys ate them and I didn’t have one complaint, that in and of itself makes for a good meal (and a miracle, really)!  I think these would be a hit at any gathering you’re having.  Here’s the scoop:

BURGER JOE’S (AKA CREAMY SLOPPY JOE’S)

Yield: 8 Hamburgers

1lb Ground Beef

1 Medium Onion- Chopped

1 Tbsp Mustard

2 Tbsp Tomato Paste

2 Tbsp Soy Sauce

½ tsp Garlic Powder

¼ tsp Pepper

1 tsp Horseradish

1-16oz Can Bean Sprouts, rinsed & drained (I did not add these)

½ C Sour Cream

 8 Hamburger Buns, toasted

Cook beef and onion in a skillet, cooking until meat is browned. Stir in mustard, tomato paste, soy sauce, garlic powder, pepper, horseradish and bean sprouts. Simmer stirring occasionally 10 minutes. Remove from heat stir in sour cream. Spoon on buns.  YUMMY!

Cinco de Mayo Sombrero Craft

5 May

Happy Cinco de Mayo Friends!  Have you ever wondered what exactly Cinco de Mayo is?  If so I’m about to tell you…  In 1862, the Mexican army defeated French forces (whose numbers were double that of the Mexican troops) in a huge battle in a town called Puebla. It was an unexpected victory and became the source of much excitement and pride, not just in Mexico, but also in many Mexican communities in the American West. When word of the May 5 victory reached mining communities in California, Mexican workers reportedly celebrated by firing rifles into the air and singing patriotic songs. That is said to be the very first Cinco de Mayo celebration…and they’ve increased in popularity ever since.  This is why  Cinco de Mayo is largely celebrated not in Mexico itself, but en los Estados Unidos!

Cinco de Mayo is not to be confused with Mexico’s official Independence Day, which is celebrated across Mexico on September 16. But here in America, May 5 has become a day to embrace Mexican heritage and pride, whether you have Mexican ancestry or not.

Tonight we are having a little family Cinco de Mayo celebration with delicious Mexican food, drinks and these lovely Sombrero centerpieces!  They were super easy to put together and the boys had a lot of fun with it.  All you need is a paper plate, paper cup, some pipe cleaners, puff balls and glue!  I twisted the pipe cleaners around the bottom of each cup for my youngest, but my older two were able to do this themselves.   I did cut off the ends for all of them to avoid any poking :).  We then glued the cup to the plate and decorated them to look like mini sombreros.   We just used colored puff balls and glued them around the edges of the plate!   We practiced patterns and counting while we were making them too!  The other idea I had was to punch a hole on either side of the cups and thread them with ribbon to make a cute banner…  What ever you choose I think they’ll be a hit at your fiesta too!


Cowboy Caviar Chip/Cracker Dip

29 Apr


I was trying to think of a recipe for an appetizer/dip that was a little bit more “healthy” and fresh than the ones I usually make.  I remembered a friend making “Cowboy Caviar” at a BBQ one time so I did a little research.  I found tons and tons of recipes online for cowboy caviar and no two were alike.  I decided to combine a couple, add some of my favorite ingredients and see what happened.   I made enough to feed an army, and if I had one over it would have been gone, it was yummy!   Here’s my recipe for Cowboy Caviar… Make it for Cinco De Mayo or your next BBQ, it really was a hit!

COWBOY CAVIAR- Mountain Style 🙂

1 green pepper, diced
1 red pepper, diced
1 orange pepper, diced
1 yellow pepper, diced
1 red onion, diced
1 can of black-eyed peas (can use dried, just cook and drain)
1 can of black beans (can use dried, just cook and drain)
1 can of pinto beans (can use dried, just cook and drain)
1 can of  corn (can use frozen, just cook and drain)
Fresh Cilantro

OPTIONAL:

Chopped Pineapple, Avocado, and/or Mango

Drain and rinse all ingredients.  Toss in LARGE bowl.

DRESSING: Bring 1/2 c. apple cider vinegar and 1 c. oil to a boil.  Remove from heat immediately and dissolve 1/2 c. sugar into mixture. Cool. Pour dressing over chopped ingredients & chill.  Serve with dipping chips or really you could even eat it like a salad…  DELICIOUS

Chicken Cherry Pasta Salad

27 Apr

It’s so funny how the weather plays a roll in what meals I’m craving or up for making.  This weeks prediction of 70 degrees has me dreaming about grilling out, backyard games, and lots of sunshine!  I figured it was time to break out the summer recipe box and see what sounded good.  I opted for one of our favorite easy to make dishes, Chicken/Turkey cherry pasta salad.  I have made this with both “meats”  and it is equally as great.  I’ve also made it with smoked turkey from the deli, leftover turkey from a special meal, and roasted chicken… I think you could leave the meat out all together and it would be awesome too!  I’m awful at measuring this out, basically the amounts don’t really matter, but if you are a measurer, Here’s the scoop:

Ingredients:

SALAD

  • 1 pound rotelle pasta
  • 1.5-2 lbs diced cooked turkey or chicken breast
  • 1 cup dried cherries
  • 1 medium diced onion (I often use green onions)
  • 4 diced celery stalks
  • 1 cup toasted whole almonds or chopped pecans (optional)
  • 1/2 bottle of Brianna’s Poppy Seed Dressing OR recipe below (I usually go with the bottle)
  • DRESSING (if you don’t use Brianna’s Poppy Seed Dressing from a Bottle)
    • 2 cups mayonnaise
    • 1/4 cup sugar
    • 2 tablespoons champagne vinegar
    • 2 tablespoons water
    • 1/4 teaspoon finely ground black pepper
    • 2 tablespoons poppy seeds
    • 2 teaspoons kosher salt
      • This meal is also a really great meal to take to neighbors or friends as a “surprise I made you dinner” sort of gift!  Sometimes I just love surprising people with dinner, it isn’t hard to do and it makes their lives just a tiny bit easier!

Earth Day Project!

20 Apr

Earth Day is April 22nd, so two days away!  Where has April gone, my father was right, time flies!     Every year in my Kindergarten class I used to make these paper mache Earth’s… It was a bit of an undertaking, but with lots of parents to help I was able to do it.  I tell you this because if you are afraid to paper mache with your children, just remember we did it with 20 kids, YOU CAN DO IT!  So here’s the scoop:

You’ll Need:

Balloons

Newspaper cut into strips,

Paper mache paste (recipe below)

Blue and Green Paint (I used tempera)

Paint Brushes

Directions:

Blow up the balloon to the desired shape.  The bigger you blow the balloon the more oval shaped it will turn, I tried to keep mine relatively small and round.  The goal of paper mache is to cover the entire balloon with the paste coated newspaper strips so GO!  I try to help the kids keep their strips flat (not crumpled) and smooth.  I also try to show them how to dip their strip in the paste and then pinch the strip and slide your fingers down to drain off any excess paste.  Once the entire balloon is covered you will need to let it dry for a day or even longer :).  You can hang it by the balloon tie to dry it, set it in a cup, or lay it flat turning it often so all sides dry.  Once the paper mache is dry you can take a marker and draw a rough estimate of the continents on your globe.  I do this just so they know where to paint.  I then have them paint the blue first outside of all the continents.  We let this dry before painting the green…  Waiting a day is ideal, but the paint will dry rather quickly….  Once they are done you can pop the balloon on the inside or just leave it to deflate on it’s own.  Viola, an Earth to last a lifetime!

Paste Recipe:

*** I always put a little white glue in with my paste, just makes me feel better about it, but it ISN’T necessary!

Mix one part flour in with two parts water… then add some white glue (optional)… Stir until pastey adding more flour or water if needed!

Chicken Wild Rice Soup

15 Apr
I know I know, it’s spring, we should be talking about grilling and salads and lots of fresh vegetables, right?  Well, I agree, but today a cold front moved in and brought some wind and the prediction of snow in the mountains so I decided to make some soup…  Plus, it’s easy to share with friends and that is exactly what I plan to do!  You might just be the recipient of a free dinner tomorrow!
  • 6 tablespoons butter
  • 1 tablespoon minced onion
  • ½ cup flour
  • 3 cups chicken broth
  • 2 cups cooked wild rice
  • 13 cup cooked chicken (I used 2 chicken breasts)
  • ½ cup carrot, finely shredded
  • 1/2 cup sliced celery
  • 3 tablespoons slivered almonds (optional)
  • ½ teaspoon salt
  • 1 cup half and half
  • 2 tablespoons dry sherry
  • snipped parsley or chives for garnish

Directions:

  1. Melt the butter in a soup pot.
  2. Saute the onion until it is softened.
  3. Blend in the flour and then gradually stir in the chicken broth. Stir constantly until it comes to a boil, keep stirring for one more minute.
  4. Add wild rice, chicken, celery, carrots, almonds, salt and simmer about 5 minutes.
  5. Add half-and-half and sherry, heat until just heated through.
  6. Garnish with chopped fresh parsley or chives.

Bunny Bags

27 Mar

Cute little bunny bags… I remember when Ben and I were dating and I went to his Parent’s house for Easter… I brought these little bags filled with treats as a “thanks for having me” gift for his family.  Of course at that time I didn’t know that his mom was an amazing chef and she made fancy treats and candy from scratch, but they still appreciated my gift!  Well, fast forward a few years and here we are having our boys make these bags!   They LOVED making them and it took them no time at all.  They would be fun little bags to bring as hostess gifts or even to have the kids make at your Easter gathering… I’ve made them with a classroom full of kids, as well… You can fill them with Easter grass and treats too!  So…. Here’s the Scoop:

You’ll Need:

Lunch size paper bags

Scissors

Construction Paper

Cotton Balls or Puff Balls

Glue

Google Eyes (optional, you can also draw eyes on)

Pipe Cleaners (again Optional, construction paper works too)

Directions:  I went ahead and cut out the ear shape for my youngest, but depending on the age of your kids they could do this themselves- my older two did!  The rest is basically up to your child.  They can draw eyes, nose, and mouth.  They can use puff balls, google eyes and construction paper.  Whiskers can be made with pipe cleaners or construction paper.  Really what ever you want…. The cutest part (not shown) is to add a little cotton ball to the back side of the bag as a tail, :)…  Your kids will love this too, I’m sure of it!  “HOPPY EASTER”

Baseball Player Checklist…

20 Mar

You know me, I love a good check list.  I feel like it empowers my children to do things for themselves, plus it makes my live a bit easier…  Here is the one I made for my Little Leaguer’s!  Thanks to melonheadz for the fun clipart!  Love her stuff! Screen shot 2015-03-20 at 11.57.12 AM