Sharing the Love!!

14 Feb

20140214-154258.jpg

This morning we had a fun little photo shoot with our fun little love bug! Thank You Ben Dodds Photography! This mom of boys could not resist the Chevron Leg Warmers!!! Her smile is contagious and we hope it brightens your day as much as it does ours!!!

Happy Valentine’s Day from our house to yours! XOXO.

20140214-154755.jpg

Borax Crystal Designs

14 Feb

20140214-075637.jpg

These hearts are so much fun to make, it’s almost like doing a science experiment and craft all in one. You really can make any shape, size, etc.. so don’t limit yourself to hearts! You’ll need Borax (which is a cleaning agent found in the laundry area of your local walmart, target, etc..), boiling water, mason jars, string, and popsicle sticks. Here are the directions:

20140210-191010.jpg

20140210-191045.jpg

20140210-191134.jpg

20140210-191153.jpg

20140213-174909.jpg

Super Bowl Craft

1 Feb

20140201-141804.jpg

Living in Colorado brings a fun excitement around the Super Bowl this year! This is an excitement I have not really experienced being a Vikings fan! My boys are so excited so we decided to do an easy craft to kick off Super Bowl weekend! Of course Shaeffer is cheering for the Seahawks (opposite in all he does), but the rest of us are showing our Bronco pride! It’s bound to be a great game and we are excited to watch it tomorrow!

To make this craft you simply need construction paper, glue and a marker… There is no right or wrong way to make them, so just cut out some rectangles, round the edges, glue them together and TADA! We accordion folded the arms and legs and drew our own footballs! We also printed out some team logos to glue on! So easy! Enjoy the game!!!

Paper Lanterns

30 Jan

20140130-144015.jpg

Tomorrow is the Chinese New Year, the year of the horse! These lanterns are so much fun to make and would be a perfect addition to your Chinese New Year Celebration!

They are also adorable for parties, sleepovers, picnics and playrooms! You could even use “fancy” paper and ribbons and use them for a wedding! They are super easy to make, as well!

Here’s the scoop:

What You Need

  • Construction paper
  • Scissors
  • Tape
  • Stapler
  • Ruler
  • Pencil
  • Glue, glitter, sequins, if desired to decorate your lantern

How to Make

  1. Use your ruler to measure and cut one inch off the short end of your paper. Set aside to use as the handle.
  2. Fold your paper in half lengthwise.
  3. Draw a line one inch from the end of the long edge of the paper opposite the folded edge. This will be the line where you stopcutting.
  4. Measure and mark lines one inch apart starting at the folded edge and moving towards the “stop cutting” line. (see photo)
  5. Cut on the marked lines up to the “stop cutting” line.
  6. Unfold the paper.
  7. Re-crease the paper in the opposite direction. This will hide any pencil marks.
  8. Match the long edges together on the lantern and use tape to hold it in place.
  9. Staple the handle to the top of the lantern.
  10. Make as many lanterns as you wish and display them around your home.
  11. If you wish, add glue, glitter, sequins or other things to decorate your lanterns. (This is the fun part for your kiddos) 🙂


Here is an easy horse craft you can also do with your kiddos!  It is the year of the horse you know 🙂  HORSE CRAFT DIRECTIONS

DSC_4760

Image

Painting Valentines #snowingoutside

30 Jan

20140130-084312.jpg

Homemade Valentine’s

23 Jan

I love Valentine’s Day… I know I’m one of those sappy people that has fallen victim to Hallmark, but I don’t care :).  I love to celebrate those we love and if I GET a designated day to do it, then by all means!  One thing I do think is important is to teach my children to tell people how they feel…  For this reason I INSIST that they make their own Valentines every year.  We have not even DISCUSSED what they want to do this year, but in the mean time, I’ll share some of our past favorites!  


IMG_4314


My boys made these before they were even in preschool… We just gave each of our neighbor friends sand buckets and shovels…   Easy and cute for little ones!  
BDP_5490

When the bigs were in preschool I cut hearts out of white paper, they wrote their names in sharpie,  and then they water painted them for their friends.  This is one of my favorites- I think I might bring it back this year for Sanders.  

BDP_9763 BDP_9765

WHO’S THE BEST VALENTINE???  

photo BDP_1447


How about making a Valentine for the birds…  This is a fun one to give to neighbors, as well!  For the directions to this craft click here… 

DSC_0866 DSC_0875

Penguins are always a hit!  Sutton is a huge penguin fan so making a penguin box and valentines was a must!!!  

DSC_0886

Valentine you’re GRRRRREAT!  

DSC_0879

SWEDISH FISH – MMMMMM….


photo-88-1

photo-87-1

These were the ones we made last year… Sometimes I wish I didn’t have a blog because then I could reproduce these ideas each year :).  


Screen Shot 2013-05-08 at 7.55.05 PM

soup-er teacher

Last year we gave fun little soup bowls from Pier One to our teachers with a bag of fancy soup mix and this little note… If you click on the PDF you can print your own!  

POOP GOOP

11 Jan

03Tupperware

Yep, you heard me right!  POOP GOOP…  When my boys were babies my pediatrician gave us a recipe for “Poop Goop”  which was the best thing to cure diaper rash!  I recently was asked by a friend what I used to cure the dreaded red bum and she said it was like magic!    It truly is the BEST thing EVER for a DIAPER RASH (what ever the cause)…

Recipe:  You use equal parts of the three ingredients…

1 part diaper ointment (ANY KIND WILL WORK FINE)

1 part Cortisone Cream (such as Cortaid)

1 part Mylanta

Mix them together and there you have it.  We keep it in a little tiny tupperware container…  I use half a tube of diaper cream, half a tube of cortisone cream and mix those together.  I add a little Mylanta at a time to thin it out…  Works like a charm!  Enjoy…

Sock Snowmen

18 Dec

socksnowmen
I love this project!  I think they turned out so cute an it’s a great WINTER project, not just a Christmas project!  The boys made this as a gift for their friends at school, but like I said they were easy and fun to make so they’d be great for a craft day, birthday party, or a fun gift for your neighbors!  Here’s the scoop…

You’ll need the following:

Hot glue gun
1- white sock.  Use one that has a mid-calf or knee high tube on the top.
decorative socks
Rice for filler
twine or ribbon
rubberbands or string
buttons
something for the nose (We used the top of a bamboo stick that we colored with sharpie)

DIRECTIONS:

1.  Cut the foot part off of your sock and discard.  You only need the tube part.  This is great if you have socks that are worn or have holes in them.

2.  Turn the tube part of your sock inside out and wrap a rubber band around the bottom or tie it with string.  Make sure it is wrapped tightly.

3.  Turn it inside out again so the rubber band is on the inside.

 4.  Fill the sock with rice.  Be sure to push the rice down as you go.  This will stretch the sock a bit and make it so you get a nice plump snowman in the end.
5.  Close the top by wrapping another rubber band around the top as shown in the photo above.
6.  Taking the ankle socks, cut as shown above.  The first one, you’ll cut off the toe and the heel.  The second sock you’ll just cut off the heel.  And, I should note.  If you have a sock that doesn’t have a mate and it’s a longer than an ankle sock, you can dress your whole snowman with just one sock.
7,8,9.   First, take the sock without a toe and a heel and put it over your rice filled sock.  This becomes the sweater.  Then, pushing the rice down to make a solid base, tie a piece of ribbon or twine around the bottom of the sweater.  Next do the same thing with the top of the sweater like shown in the middle photo above.  And, last but not least, add the hat.  The hat is the other sock that you cut up that still has the toe.

10:  Next you add your embellishments.  Eyes, nose, buttons etc…  you can sew them on if you want but I  just used hot glue.

TADA…..

Through Another’s Eyes- Her Story

6 Dec

photo-6

It’s not very often that we get to look through the lense of another person.  Infact it’s rare, if at all…  I feel extremely blessed to have been given the opportunity to look through the eyes of another woman.  Not any woman, however, but the lense of a single mom raising a child with special needs.  You see, a single mom in our community gave birth to a baby girl about 8 months ago with Down syndrome.  In preparing for the birth of her baby, this mom was like any of the rest of us… She was planning their lives together, nesting, and dreaming about her daughter’s future.  She was faced with the challenge of doing this alone, but was running at it full force.  At the birth of her daughter she was told that the baby had some complications.  Her lungs were not functioning correctly and the baby was quickly whisked away to another hospital for treatment.  She was also told, for the first time,  that her little girl was born with Down syndrome.   This is where we came into the picture.  We were sent an email to pray for this Momma and her sweet angel.  We started and  have not stopped.  I felt a strong bond to this mom and her daughter and have really been involved in their lives ever since.  Ben and I volunteer to take the baby when ever her mom needs.  We have her at least 6 times a week…   She is part of our family in every possible way.  We love her as if she were our own.   She has a biological big brother and a Mom that worship the ground she walks on, plus our family of 5 that think she’s the cat’s meow- she is so LOVED!

Here is the thing, this sweet baby has Down syndrome.  A syndrome that is recognizable to most people in our society.  As her primary care giver much of the time I’ve learned many aspects of what it’s like to have a child with special needs.  She receives services on almost a daily basis.  Whether it’s OT, PT, Speech or something else, our home is open to therapists every day.  I’ve learned about her body and how it operates a little differently than yours and mine.  I’ve learned how to support her and teach her based on who she is.  I love every aspect of this child so to me these things are now part of our daily lives, they are normal.

I’ve also seen what it’s like to be a Mom of a special needs child in public.  I’ve experienced looks of sympathy, embarrassment, shock, and confusion.   I’ve answered lots of questions and explained her story to complete strangers.  As a teacher I’ve always tried to listen and understand what all my parents want and desire for their children.  I’ve always tried to learn as much as I can about all my students especially those with special needs, but this is different….  I have a new hope, a hope that the world would accept her differences, a hope that we would all see that we are more alike than different, a hope that you all get to experience this beautiful child!  Looking through the eyes of a Down syndrome parent has made me a better person.  It has made my children better children, it has made my family a better family,  it has blessed us in a way I can’t even explain.

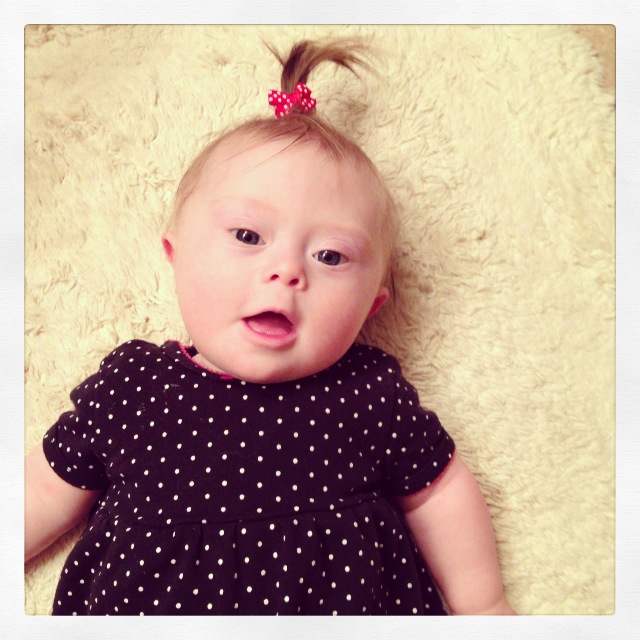
Let me tell you about her…  She is the easiest baby I’ve met…  She has a smile that will take your breath away!  Her SOUL is full of joy!  She lights up when you talk to her!   She cries when she’s hungry, wet or bored- but just a little.  She loves to be held and talked to…  She has the biggest blue eyes that have a star like sparkle! Purple is her color!  She loves Ben and his beard :)!  She’s curious and brilliant and beautiful!  She’s one amazing girl that holds a special place in my heart!

I know that we are all not able to take outside children into our homes, especially those with special needs.  I think this connection was divine 🙂 and that made the details just work out.  BUT I do think that we can control our thoughts and actions whether in public or private.  I think we can try our best to put ourselves in other people’s shoes.  AND…  if you by chance have the opportunity to look through the eyes of another, snatch it up!  It will change your life forever, I PROMISE…  XOXO

Sweet Potato Muffins

27 Nov

20131127-104322.jpg

A friend of ours made these muffins for my Mom’s birthday brunch and my boys devoured them! I figured they would be a good addition to our Thanksgiving menu this year! Here’s the scoop…

Sweet Potato Muffins
1 sweet potato (10-12 oz) shredded
2 Tablespoons fresh lemon juice
2 eggs
1 cup canola oil or applesauce
1 cup sugar
1.5 cups flour
1 teaspoon baking powder
Half teaspoon baking soda
1/4 teaspoon salt
1 teaspoon cinnamon
3/4 cups chopped nuts (optional)

Preheat oven to 350′

Toss shredded sweet potato with lemon juice and set aside. Combine eggs, oil and sugar. Beat one minute until smooth. Add dry ingredients and mix at low speed until combine. Fold in sweet potato and nuts (if using). Spoon batter into paper lined or greased muffin tins, Filling 2/3 full. Sprinkle tops with brown sugar. Bake for 20-25 minutes.

Design a site like this with WordPress.com
Get started